This is the basic method for doing a Moss Safari and maximising your chance of finding the Big Five and the other single cellular organisms that live in moss.
Note this has brought together the information that I had written in several earlier posts, with additional information where necessary.
Purpose of doing a Moss Safari
To look at and learn about organisms that you rarely see that are on your door step.
Improve your microscopy skills, observation and appreciation of nature.
Apply scientific ideas of cells, classification, adaptation, behaviour and evolution among other principles of natural history.
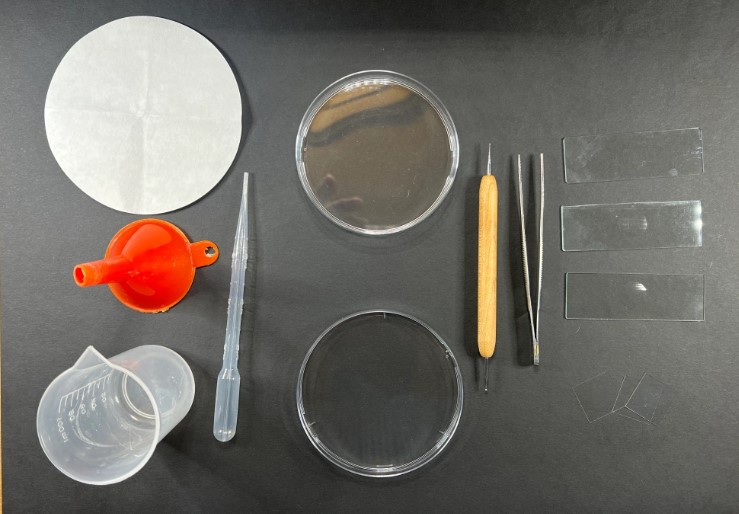
What you will need:
- Moss from a sustainable source (see Stage 1 below)
- A compound microscope (my microscopes here) other examples here.
- A Petri dish (or small container e.g. empty yogurt pot, margarine tub or similar).
- Distilled or mineral water (boiled and cooled tap water will work)
- A mounted needle, cocktail stick, wooden tooth pick or pencil. to agitate the moss stems.
- A plastic Pasteur pipette (not essential)
- A plastic filter funnel
- Filter paper (coffee filter paper or thick kitchen tissue will work)
- A flask, cup or container to hold the filter funnel.
- Microscope slide (glass) ideally with a dimple/well
- Glass cover slips
Stage 1: Collecting some moss
You only need a small piece of moss, about the size of an adult thumbnail will be plenty.
It is best to find and collect moss that has already been dislodged from where it is growing, rather than removing it from it’s habitat. For example, look for lumps of moss that have been knocked down from a roof. Look on pavements or patios for dislodged pieces of moss. It doesn’t have to be particularly green or ‘nice looking’ to yield some good organisms.
Avoid taking large patches of moss from it’s habitat. Think sustainably. Moss does take time to regrow. Also take care not to remove or disturb any rare mosses.
Take notes: where did you collect the moss? When did you collect the moss (date and time)? What does it look like: describe the colour; lengths of the ‘stalks’; growth form: tufts or trailing; any sporophytes shape and colour (coloured stalks and pods)?

Stage 2: Preparing your moss squeeze
Unless the moss you have collected is soaking wet, it is best to soak it for at least two hours, ideally 24 hours.
Place the moss sample in the Petri-dish (or similar), pour in mineral water (or similar) into the dish, so that it partially submerges the moss.
You have two options:
A. to squeeze the water from the moss directly onto the microscope slide or
B. to concentrate the moss squeeze organisms by filtering.
A. Direct Moss Squeeze
Take your soaked moss and agitate the stems with a mounted needle, toothpick or pencil tip.
Squeeze out the water from the moss, so that one or two drops land on a microscope slide. Alternatively, squeeze out the moss water into a dish, then use a pipette to put a few drops on a microscope slide.
B. Concentrated Moss Squeeze
To get more moss organisms per drop of water, you can concentrate them by filtering out some of the excess water.
Take your soaked moss and agitate the stems with a mounted needle, toothpick or pencil tip.
Squeeze out the water from the moss into a prepared filter paper in a funnel and collection flask. Watch the water level go down in the filter paper, as the level gets to the bottom of the filter paper, suck up the remaining water in the pipette.
Note a common mistake is for people to collect the filtrate and not the residue. The purpose of this step is to collect the organisms collected in the filter paper (like using a colander to empty boiling potatoes: you want the potatoes, not the water that is ‘filtered’ out!).
Transfer these drops onto a microscope slide.
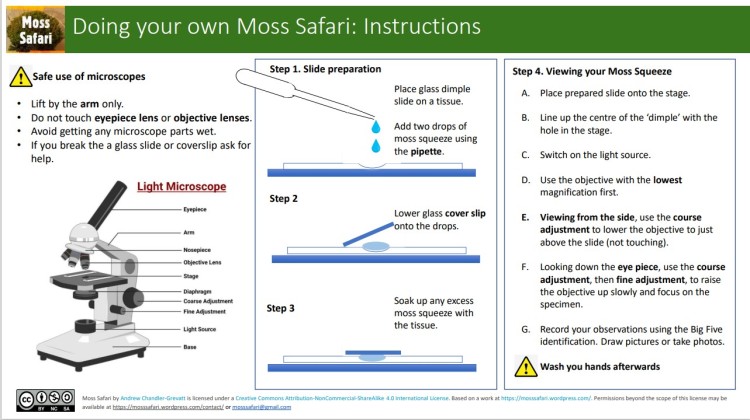
Next steps for both A & B
If you have used a ‘dimple’ microscope slide, place a glass coverslip of the well on the slide.
If you are using a flat slide (without a dimple), use one of these methods to place the cover slip on without crushing the organisms.
Stage 3: Observing your moss squeeze
Prepare 3-5 slides from your moss squeeze, using the basic moss squeeze approach.
Each expedition takes 15-30 minutes, depending on the number of stops.
Start on the lowest magnification and focus on the sample in the top left hand corner (Figure 1).
Then slowly scan left to right using the slide stage mechanism.
Stop and focus on anything interesting.
Note that organisms may whizz by, avoid trying to chase them. Continue with your journey.
Once at the end of the cover slip, move down and continue the journey from right to left (Figure 1). Repeat until end of slide.

When you observe something of interest, stop, use the fine focus to look at it closer.
You may wish to stop and photograph it.
If it is too small, consider increasing the magnification.
Make sure the organism is in the centre of view before increasing the magnification.
At an increased magnification, you may wish to adjust the LED light or diaphragm as well as the fine magnification to improve the image.
After taking photos or observing, move back to the lowest magnification and continue of your journey plan.
Stage 4: Identifying the organisms
Observing a Moss Safari squeeze for the first time. Just watch and enjoy. Observe the biodiversity, the shapes, the colours, the movement. Try turning the fine focus knob and see what else comes into focus.
Identifying the organisms.
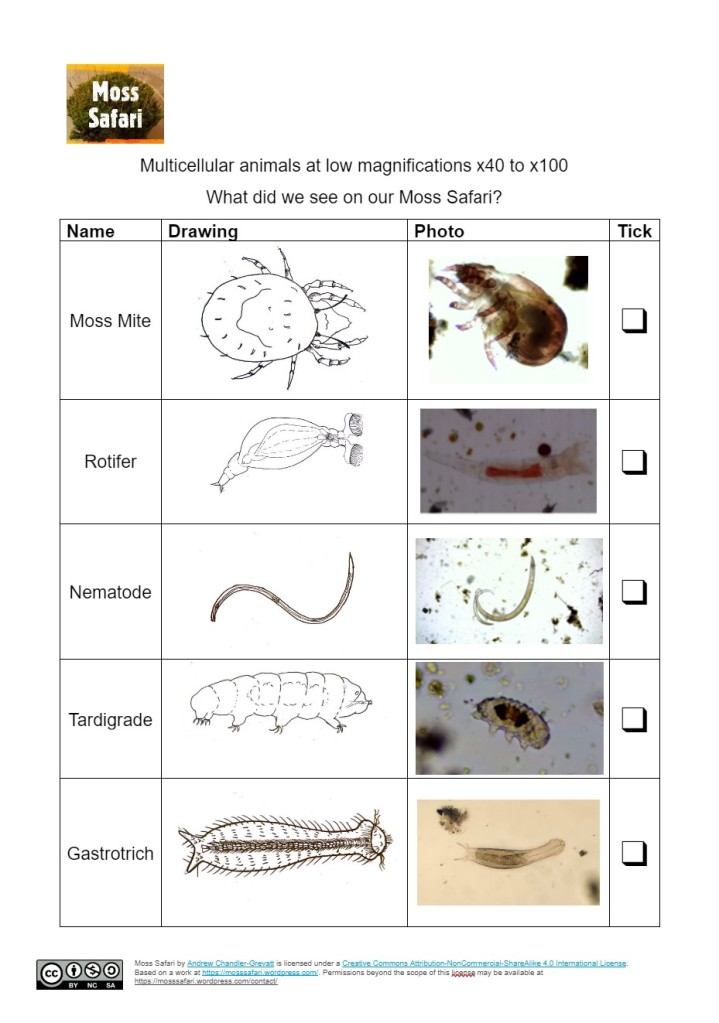
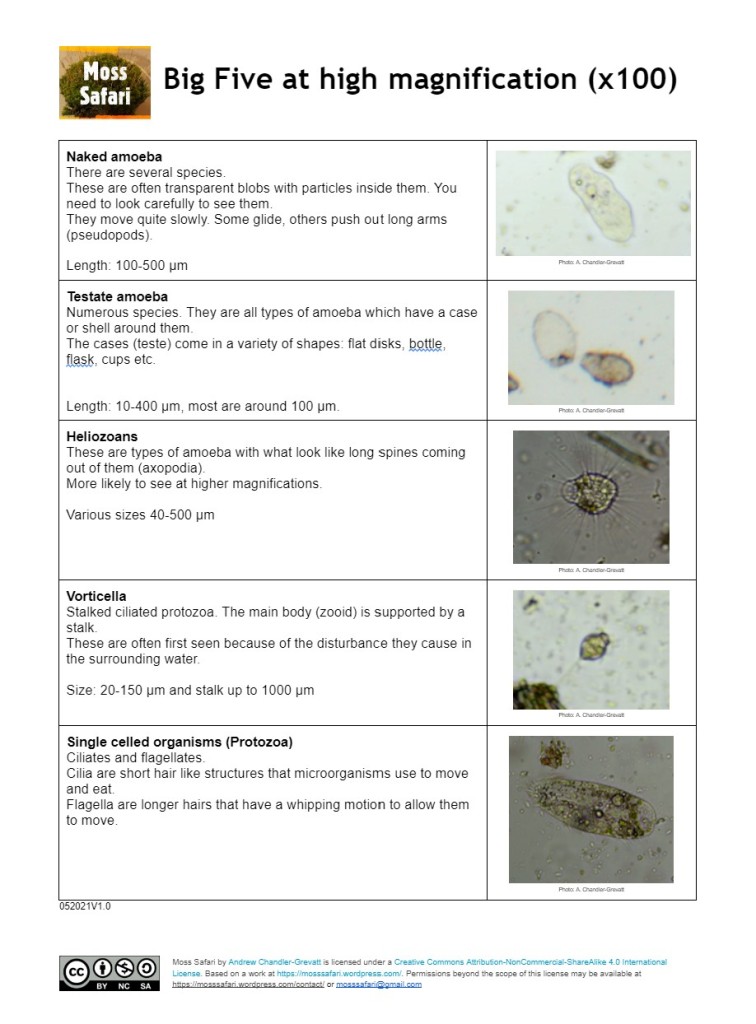
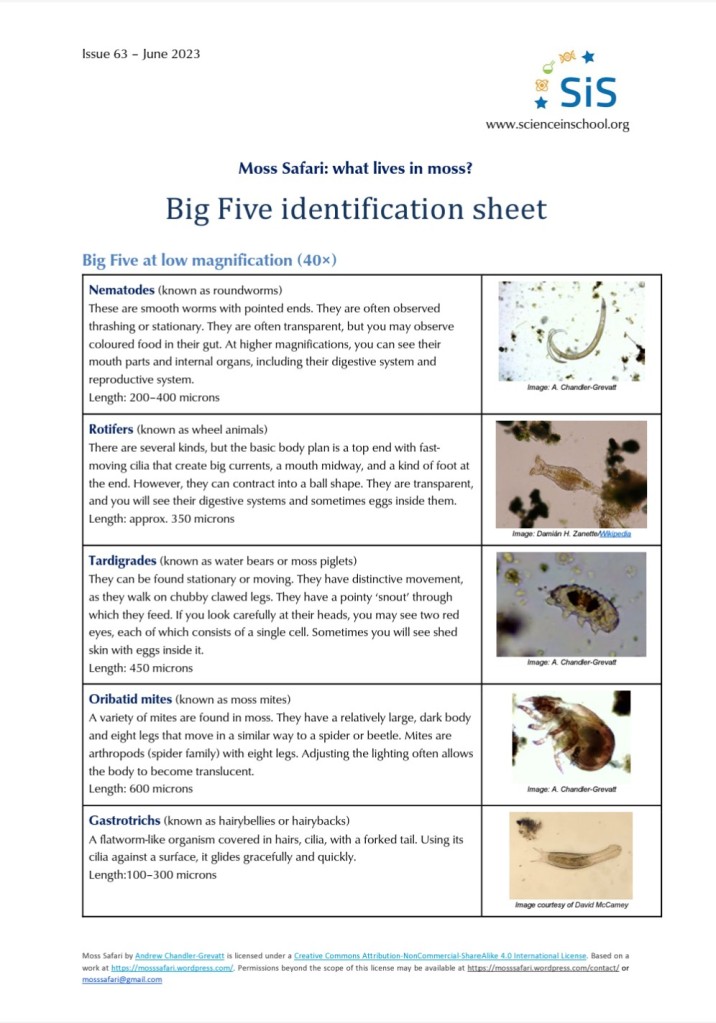
You will see animals, plants, protists, fungi and bacteria in a Moss Squeeze. The Big Five (at x40) are the easiest to spot because they are they larger (nearer a millimeter) and are multicellular. They are all animals which have distinctive behaviours and features.
I have made three resources that help you to identify the Big Five at x40 – multicellular and Big 5 at x 100 – single cellular. These are free to download here.

If you are feeling more confident and want to find out more, this is the book I started with that is helpful for both multicellular and unicellular organisms.

Other Resources
Approaches to Moss Safari have been written up in various place. These papers, blogs and videos all provide some guidance of how to do a Moss Safari.
Science in Schools Article June 2023 What’s in Moss? Has these free resources:


LiFeLaB: What’s it all about series: Moss Safari video
Philip Harris: Explore Microorganisms on a Moss Safari blog
Youtube: SSERC Using the hanging drop technique: Moss Safari
References
Basic Moss Squeeze is described in Hingley, M. (1993). Microscopic life in Sphagnum. Naturalists’ Handbook 20. Slough: Pelagic Publishing. p.56
My method was published in this paper: Chandler-Grevatt, A., (2021). Moss Safari: inspiring interest in nature under the microscope. School Science Review, 102(381), pp.49-55. Reprinted in: ASE International, 12, 6-14. Available at https://www.ase.org.uk/resources/school-science-review/issue-381. If you’d like a copy, please get in touch.
